Home » Articles posted by Herbert Winter
Author Archives: Herbert Winter
Water Heater Repair – What You Need to Know
Water heaters get more of a workout than most pieces of household equipment, so it’s natural for them to develop problems. Repairing these issues promptly helps keep your home comfortable and efficient. Contact Water Heater Repair Houston for professional help.
Hissing or popping sounds could indicate sediment buildup or a failing component. It’s also important to drain and flush the tank regularly.
Water heaters provide us with hot water for washing dishes, laundry, showering, and other uses. If a water heater has issues, it’s important to have the problem diagnosed and fixed as quickly as possible to avoid costly damage. A licensed plumber is trained to work on all aspects of a water heater, including the tank, heating elements, and the pipes and valves that make up the crucial system.
However, there are certain plumbing-related issues that only a licensed electrician can fix. For example, a water heater with a faulty gas line or electrical connections must be addressed by an electrician to avoid serious and possibly dangerous complications. Similarly, if a water heater is making strange noises, it may be a sign of a major problem such as rusting or a gas leak that requires the attention of a licensed professional.
A rumbling sound from your water heater may indicate sediment buildup, which is a common problem. Water heaters must be flushed to remove the sediment and protect the tank from deterioration. A rumbling sound is caused by water clashing against the sediments as it heats up and expands.
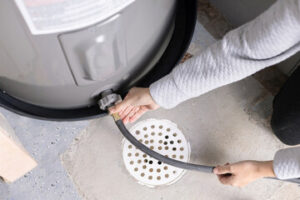
If your water heater is leaking, it’s also important to have it repaired as soon as possible to prevent flooding and other potential problems. Water heaters are designed to hold about 75 gallons of water, and any leaks can cause significant damage to the surrounding area if left unchecked for too long.
Water heater leaks are often caused by loose inlet or outlet pipe connections. These can be tightened with a wrench, but more severe leaks are best handled by a licensed plumber. Another common problem is a faulty pressure relief valve or pilot light. These are usually easy to replace, but a faulty thermocouple or anode rod must be replaced by a licensed plumber. In some cases, these issues may require the replacement of the entire water heater.
Save Time
The water heater is a vital part of your home, providing everything from hot showers to washing dishes and heating the cold water supply. As such, it needs to be properly maintained to function at its best. A lack of maintenance can lead to sediment accumulation, a shorter lifespan, and increased energy costs. Fortunately, there are several ways to avoid these issues. Recognizing the signs of a water heater that is on its last legs and taking action promptly can save you from costly repairs in the future.
If you notice pooling water around your water heater or a leak from the tank or pipes, it is time to call a professional for water heater repair. A professional will be able to quickly diagnose the issue and provide a quick fix. In addition, professional plumbers have years of experience dealing with a variety of water heater issues, so they know how to spot problem areas and find efficient solutions.
In addition to checking for signs of leaks, rust, and corrosion, a water heater inspection should include testing the pressure relief valve. This is a safety feature designed to prevent dangerous over-pressurization. The valve is easy to test by turning off the power or gas to the water heater and allowing the hot water to drain into a bucket. If the valve fails to open when triggered, it is time for a replacement.
Another important aspect of water heater repair is regularly cleaning the area around the pilot light and air intake. A buildup of dust can block the gas line, causing the pilot light to go out. This can result in a loss of heat, and may also cause the water to be discolored or smelly. A plumber can easily clean this area to restore proper operation.
Performing regular water heater maintenance is the best way to reduce your energy costs, extend its lifespan, and protect your home from expensive damage. While it is possible to do some of these maintenance tasks on your own, a professional plumber will be able to conduct an expert evaluation and ensure all components are working as they should. In addition, some services offer warranty protection that covers unforeseen problems that arise after the repair.
Comply with Building Codes
If you have a water heater that leaks or makes other odd noises, the problem could be more than just a nuisance. It might indicate that you have a damaged thermal expansion tank or faulty pressure relief valve, both of which should be addressed by a professional plumber. They have the training and tools to safely handle these plumbing-specific issues, which are not usually DIY repair jobs.
Water heater repairs often involve working with high-temperature water and other components that can be dangerous for untrained people to handle. For instance, replacing a dip tube requires the water heater to be electrically and hydraulically isolated (with power off and all inlet and outlet valves closed). The tank must also be drained, and the water must be bled off to prevent steam burns or other damage to the water heater or pipe connections.
The temperature and pressure relief valves on your water heater are designed to release excess temperatures or pressure to prevent safety hazards. However, they will not operate properly if the discharge piping is not installed correctly or if it contains blockages like tee fittings or other objects. In many cases, obtaining a permit and scheduling regular inspections is required to comply with building codes and ensure your water heater is safe for use.
Getting water heater repairs done right can help you save money in the long run. For example, if your hot water heater is leaking or producing rust-colored water, this could be a sign of internal corrosion and should be replaced immediately. In addition, if your water heater is making rumbling noises or sounds like a popcorn machine during heating cycles, this may indicate sediment buildup and the need to drain and flush the tank.
Hiring a professional plumber to do the job can save you time and money in the long run. In addition, they can offer advice on how to keep your water heater running efficiently and safely, so it lasts longer. Using these tips can help you get the most out of your water heater and ensure your family has reliable hot water for all your daily needs.
Use the Right Tools
When it comes to water heater repair, having the right tools can make the difference between successfully tackling an issue and accidentally worsening the problem. A good set of basic tools should include plumbing pliers, pipe wrenches and a screwdriver. A Phillips screwdriver is essential for screws with a cross-shaped slot, while a flat-head screwdriver works well on round fittings and nuts. Plumber’s putty or a similar type of sealant is also necessary for making watertight connections and filling holes.
A thermometer and continuity tester are useful tools for checking the heating elements in an electric water heater. These can be found behind access panels on the side of the tank. To test them, shut off the water supply and drain the tank. Connect the alligator clamp to one of the terminal screws and touch the probe of the continuity tester to the other screw. If the continuity tester stays lit, it indicates that the heating element is working properly. If the testing is unsuccessful, it’s time to replace the heating element.
Another tool that’s crucial for water heater repair is a pressure-reducing valve. This is a safety feature designed to prevent excessive pressure buildup in the tank that could lead to the release of scalding hot water and steam. To check if the pressure-reducing valve is working, turn off the water and power to the tank, then drain the water until the water level is below the valve. Unscrew the valve and screw in a new one that’s appropriate for the size of your water heater.
Other important tools for water heater repairs are a hose to drain the tank, a wire cutter and a spanner or wrench to remove the leaking temperature/pressure relief valve (T&P). This is a safety feature that needs to be checked a few times a year to ensure it is functioning correctly. A faulty T&P valve can allow scalding water and steam to escape from the tank, so it’s important that this safety feature is functional. To check it, turn off the power and water, then open the valve and let it drain into a bucket that’s below the plastic relief valve drain pipe.
Financing Options For Roof Replacement
A healthy roof protects a home from the elements. Damaged roofing can lead to mold, mildew, water leaking inside the house and lower property value upon resale.

Depending on the extent of the damage, homeowners may choose to opt for a repair or a roof replacement.
The roof is an integral part of any home, but it’s also one of the most expensive house renovation projects. Although regular maintenance can extend the life of a roof, eventually it will need to be replaced to protect the integrity of the structure and prevent leaks and other damage. Fortunately, homeowners can minimize the cost of roofing replacement by considering financing options.
The cost of a new roof depends on several factors, including the size of the existing roof and the material chosen for the replacement. Some of these costs are out of the homeowner’s control, such as geographic location and weather conditions. However, the choice of shingle type and alternate materials can have a major impact on the overall cost. While basic asphalt shingles are the most affordable option, more expensive options like slate or metal are available for those willing to pay more.
In addition to the cost of materials, homeowners should also consider labor and disposal charges for their old roof. Labor to tear off a roof can cost $1 to $3 per square foot, while the cost of disposing of the old roof can be significantly higher. Moreover, roof removal may require removing other structural elements, such as the roof decking and trusses. These costs can range from $2 to $5 per square foot, depending on the type of roof and the amount of structural damage.
Other factors that can affect the cost of a roof include the complexity of the installation, the roof’s shape and slope, and the number of special features, such as dormer windows, skylights, or chimneys. These items can increase the price of a roof because they require additional flashing and are more difficult to install than standard roofs. Additionally, the cost of a roof can also be affected by its pitch or slope, which requires extra safety precautions and more labor.
It’s important to plan ahead for a roof replacement, especially if it will involve significant construction and heavy machinery. If you have pets, it’s best to keep them at a friend’s or kennel service during the replacement, as the noise and hammers can disturb them. If you can’t, make sure to provide them with a safe, quiet space where they can rest and have access to their favorite toys.
Warranty
When a homeowner invests in a home improvement project, they want to feel confident that their investment will be protected. That’s why warranties are an important part of the homeowner protection arsenal. They offer a safety net for a variety of different products and services, including roofs.
When selecting a contractor, it is important to review the warranties they offer before signing a contract. Many contractors offer a workmanship warranty and a manufacturer warranty on their work, and both play an essential role in providing consumer protection.
A workmanship warranty covers the craftsmanship of a roofing project and can protect against defects in the installation process. While this type of warranty is usually standard, it can differ from one contractor to the next. Be sure to ask your prospective contractor about their warranty and ensure that it is written and in your possession upon completion of the project.
On the other hand, a manufacturer warranty is an assurance from a product manufacturer that their products will function properly and last for a specific time period. A manufacturer warranty can cover repairs or even replacement of the product if it fails to perform as promised.
The length of a manufacturer warranty will vary by manufacturer, but most will offer a warranty for up to 30 years on their products. It is also important to keep in mind that the manufacturer warranty may not cover everything. For example, wind, hail and lightning damage are typically not covered by a manufacturer’s warranty.
It’s important to understand the differences between contractor and manufacturer warranties so that you can make the best choice for your roofing needs. Contractor warranties focus on the craftsmanship and materials used in a construction or service project, while manufacturer warranties are more concerned with the quality of the products themselves.
Another thing to keep in mind is that a warranty is not transferable, so it is important to stick with your original contractor for the entire life of the warranty. It is not uncommon for homeowners to violate their warranty by bringing in a different contractor or failing to follow maintenance guidelines, which can lead to the termination of the contract and nullification of the warranty.
Installation
The roof is one of the most important parts of a home. It protects your family from storms and keeps the house a comfortable temperature all year round. If your roof is damaged, it needs to be repaired or replaced as soon as possible. This is because damage to your roof can lead to leaks, pest infestation, mold and mildew, higher heating and cooling bills, and a lower resale value for your home.
The first step in a roof replacement is the tear-off process. The roofing contractor will remove any debris or trash from the site and move vehicles off the driveway. He or she will also cover any plants and shrubs with tarps. This will prevent them from getting covered with shingles and other debris. The contractor will also cover any open drains to prevent clogging.
During the tear-off process, the roofing crew will inspect the sheathing (or roof decking) and the flashing for any signs of damage. The sheathing is the inner layer of your roof that helps hold shingles or tiles in place. If the sheathing is rotten, it will need to be replaced before the new roof can be installed. The contractor will also inspect the flashing around chimneys and vents. If it is corroded, it will need to be replaced as well.
Once the old roof is removed, the roofing contractors will install a sheet of felt or a breathable synthetic underlayment. The underlayment creates an inner barrier that stops water from penetrating the sheathing and causing moisture problems in your home. The underlayment is usually tacked or stapled to the sheathing and is placed in rows up to the peak of the roof.
Before starting on the roof, the roofing contractors will check with your local city or township to make sure that all required permits have been obtained. Some communities have HOAs or Architectural Review Boards that regulate the types of roofing materials allowed, so it’s essential to make sure that all permit requirements are met before beginning work on your new roof. It is also important to notify your neighbors about the work and any noise or disturbance that may affect them. This will help keep everyone happy and allow your neighbors to prepare for the work ahead of time.
The Benefits of Carpet Cleaners
Joondalup Carpet Cleaners reach deep into a rug’s fibers, removing dirt that vacuums can’t. And regular cleaning helps extend the lifespan of rugs.
Carpet cleaners must operate heavy equipment and perform physical labor over a day. They also need basic customer service skills to interact with clients.
Carpets provide warmth, comfort, and aesthetic appeal to any home or workplace. However, if not properly cleaned, they can also be a breeding ground for dust mites, dirt, allergens, and harmful contaminants. These pollutants can cause breathing problems and exacerbate allergies, leading to sneezing, coughing, and itchy eyes.
Carpet cleaners help to improve indoor air quality by removing the harmful contaminants that collect in them. They do this by scrubbing the surface of carpets and using high temperatures to destroy the microscopic allergens that live in them. This prevents these allergens from being released into the air when you walk over them or vacuum them.
It is important to remember that carpets need frequent cleaning because environmental conditions like dusty or polluted areas or high humidity levels can make them accumulate dirt and pollutants faster. In addition, households with residents sensitive to allergens or prone to respiratory issues should clean their carpets more frequently.
Besides releasing harmful chemicals into the air, dirty carpets can also retain moisture and encourage the growth of mildew or mould, which affects the quality of the air you breathe. This is because mildew and mold produce volatile organic compounds (VOCs), which can irritate the nose, throat, and sinuses.
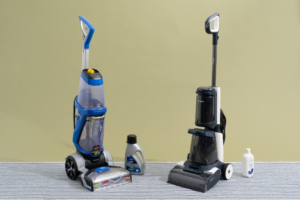
The best carpet cleaners will come with a variety of features that make them easier and more efficient to use. For instance, some models will have attachments that allow you to clean stairs or other hard-to-reach areas. Others will have adjustable settings that let you tailor the cleaning process to different types of carpets and floors. Some may even have heated elements that help with faster drying times or apps for easy control.
The odors from cooking, smoking, production or automotive fluids and greases, and other sources can be trapped in carpets, making them smell unpleasant. Carpet cleaners remove these odors and leave your spaces smelling fresh and clean. They can also help deodorize pet urine, which can be very difficult to remove on your own. They can also eliminate stale or musty odors from basements or other storage spaces that don’t get much natural ventilation.
Carpet shampooers use a combination of water, detergent, and agitation to lift dirt and grime from carpet fibers, then powerful suction removes the dirt and cleaning products. The process leaves behind fresher-smelling carpets that feel softer and look brighter, and the removal of stubborn and deep-seated stains can make your carpets last longer.
Most quality carpet cleaners come with extra features to enhance their effectiveness, such as a dispenser that automatically mixes and dispenses cleaning solution, a detachable pretreat stain remover wand for treating set-in stains, an internal water heater to help heat or maintain the temperature of the water, dry-only settings that suck up excess moisture after washing for faster drying times, rotating brushes, and more. Many also have a convenient carrying handle, making them easy to move from room to room.
It’s a good idea to vacuum frequently, especially in high-traffic areas of the home or office where dirt builds up. However, regular cleanings with a carpet shampooer will provide even better results. This is because vacuums simply don’t have the power to penetrate deeply into the pile or fibers of carpeting, where some lingering dirt and debris can hide.
Depending on where you live or work, your carpets may be exposed to lots of odor-producing sources, such as cooking oils, production and automotive fluids, pet urine and dander, and more. Over time, these odors can become embedded in the fibers and cause unpleasant smells that permeate your entire home or office. Regular cleanings with a quality carpet cleaner will help keep these odors at bay.
In addition, if anyone in your household or business smokes cigarettes, the cigarette smoke can get trapped in carpeting fibers and leave an unpleasant smell behind. If you have smokers in your home, it’s a good idea to have the carpets cleaned several times a year to prevent these odors.
Carpet can be nice and cozy underfoot, but it’s not easy to keep clean. Dirt, dust, and allergens get trapped in the fibers, where they’re difficult to reach with a vacuum or household cleaner. Regular cleaning by a professional carpet cleaner can help to preserve your carpets and keep them looking their best.
Professional carpet cleaners are able to tackle dirt, dust, and allergens that regular vacuuming and cleaning products can’t remove. They use high-quality equipment and professional cleaning methods to restore your carpets to like-new condition. It’s a good idea to let them know beforehand about any major problem areas or traffic zones so they can plan accordingly and bring the right tools, equipment, and supplies to address these issues.
Using the full capabilities of their professional-grade equipment, a carpet cleaner will be able to work much faster than an average vacuum or household cleaning product. In addition, they’ll also save you time by not having to stop and empty the dirty water tank or refill it repeatedly. Their large tanks hold more water, too, so they can clean a room without having to stop multiple times or worry about running out of clean water.
If you’re looking to hire a carpet cleaner, be sure to find one that offers flexible scheduling options to fit your busy lifestyle. It’s also a good idea to choose one with an established track record in the industry and that strives for customer satisfaction.
A clean, comfortable environment is a big part of a healthy lifestyle. It’s especially important for children, who spend a lot of time playing on the floor. It’s important for their developing immune systems to be able to play in an area that is free of contaminants and other harmful materials that could irritate them or even cause health problems down the road. A regularly scheduled professional carpet cleaning can help to provide this kind of safe, healthy environment for your children. In addition, a clean, fresh-smelling carpet can contribute to the overall atmosphere of your home, making it feel more relaxing and peaceful.
Carpets can collect a variety of debris that is harmful to children’s health. This includes dust mites, pet dander, mold spores, mildew, and other microscopic contaminants. Having these pollutants in your home’s carpet can lead to breathing issues, such as coughing, sneezing, wheezing, and itchy skin. Carpet cleaning can get rid of these pollutants and keep your kids healthy.
Carpet cleaners can also remove many types of stains. This is particularly important in homes with newborns and toddlers. These young kids spend a lot of time playing on the floor, which can result in spills, messes, and odors that are difficult to clean.
These stains can be caused by a wide variety of substances, including food, drinks, nail polish, and paint. Often, these stains are not easily removed by household detergents or spot cleaners. These stains can leave behind nasty, stiff fibers that are unpleasant to touch. Carpet cleaners can eliminate these stains and restore the beauty of your carpet.
Newborns and toddlers have particularly sensitive immune systems. They are also developing physically, which means that they need to explore their environment. This exploration can often occur on the ground, where they may come in contact with dirt, dander, and other allergens that are trapped in carpeting. This can lead to respiratory complications, such as asthma, as well as skin problems, like rashes and itchy skin.
In addition to these concerns, unclean carpets can harbor bacteria. One square inch of carpet can hold 200,000 bacteria, which is enough to cause infections in young children. These bacteria can include staphylococcus, salmonella, and E coli. These bacteria can cause a variety of symptoms, from skin infections to digestive upsets.
Getting your carpets cleaned regularly is an essential part of maintaining a safe and healthy home. Frequent carpet cleaning can reduce allergies, asthma, and other respiratory illnesses, as well as provide a safer and more pleasant environment for kids to play in. Keeping your children’s environments clean can promote healthy growth and development, and help them develop strong, robust immune systems that will serve them throughout their lives.